Tag Archives: gaming

Creating the battlefield part 3

Heya people.

I’m back with another part of my current project. So far it’s been a lot of fun and it hasn’t stopped with the last 2 tiles.

The next tile I will be showing you is a little different from the previous one, meaning: this tile doesn’t represent a desert-located part of the battlefield.

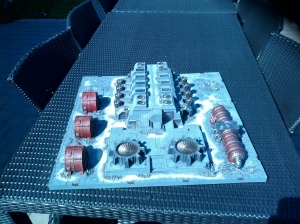
I present to you: the Manufactorum. Now this tile is just packed with details. And the previous were already so detailed, but let me tell you, this is just gorgeous. From the massive manufactorum building at the center of it all to the small coolant valves and the energy generators on the side and back, this tile was just a treat to paint.

For the basic street I was going for a somewhat darker grey than what I intended for the building, so the tile was first painted in a medium grey, along with the building. Then, everythung EXCEPT the building was washed down with a dilluted black wash, 50/50 wash to water. Then, after everything was completely dried, I filled all the lines in between the  street tiles with a black wash. The piles of rubble were also washed black. Then, when all washes were completely dried, I drybrushed the piles of rock and rubble, and the building, with a light grey. This would accentuate the concrete structure the building has and bring up the level of debris.

After all that was done, I progressed further on details. Everything metal was painted with a mexium iron metallic, washed blue and then drybrushed angain with medium iron. The brass parts were painted in a medium brass, than washed with a brown earthshade wash, drybrushing it again here and there with the medium brass. The red was done painting it with a medium to dark red, then a crimson wash, followed by light drybrush of the same red paint and ultimately drybrush lightly with a medium iron metallic, ton gve it a nice, weathered, chipped look.

And then the only thing left was small detailing. Looking closely to board you will find all kinds of computer sscreens, buttons and such. So these were painted using z variety of colours, but not to much, as I didn’t want it to look like a rainbow fest gone mad. For the standard buttons, like keyboards and such, I used a white painted, while for screens I used mostly red en green, washing them with a dilluted wash of a matching colour. Even clear psints were used, though mostly only Tamiya’s Clear Red.

Ventilator shafts and such were painted using a medium iron metallic, washed with black and then drybrushed with medium iron, to give it a sense of depth. Then, when eveything was finished, the last step was environmental weathering, using the same drybrush specific paintnI used for the desert styled tiles. Mostly, thix drybrushing was focused all around the manufactorum, and from that base I just drybrushed some random spots, varying from big spots to small. Here and there, a variety of weapons were laying around, so these were painted in Iron Warriors colours to give a link back to the other tiles. And that’s it.

If you scroll down you will find the pictures of the Manufactorum. I hope you like as much as I do, because I just had a lot of fun painting them, and these tiles alltogether have been some of my best work I have done so far, if I may be so bold to say so.

Leaves me with 3 mire tiles to finish. And they are coming out really nicely. So I hope I will be uploading those soon.

Untill then, enjoy!
kr
kr
kr
kr
kr
kr

Creating the battlefield part 2

Heya guys.

Last time I uploaded a post, I showed you the first piece of a board I am painting that will be mostly used for Horus Heresy games. In this post I will be showing you the next piece of the board. I had a lot of fun painting this, not only because the tile is so detailed and such, but because it came with a small personal challenge. The surface of this board would have to be painted in the same way as the crashed Thunderhawk so that both tiles could be laid next to eachother and not see any difference in shade, texture and such. And I am very pleased to say that it worked out very well.

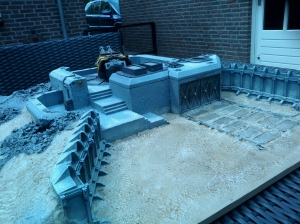
The piece I am talking about is the Primus Redoubt, redubbed the Iron Redoubt to stay in theme. The surface of the board is, explained, painted in the same theme as the crashed Thunderhawk tile, a desert styled environment. I knew I wanted the bunker itself to be a medium light grey so it could be drybrushed with a light grey so I could give all the edges and detail some extra attention. And don’t think the bunker is just some straight-on, flat surface, because when you would look at the bunker closely, you can easily see the very concrete-like look it has.

This tile has something more than the CT tile, which is a certain amount of craters and piles of rubble. These were painted in a medium grey, washed with black shade and drybrushed with a lighter grey but leaving the inside of the craters untouched, giving the idea that the inside is where the missile/projectile has exploded and the ground has not recovered from it since.

All the metal on the board, like gantries, ventilator shafts and such, were painted in a medium iron metallic, washed blue and drybrushed again with the medium iron metallic, then a soft drybrush of light iron metallic to add more chipping effect to it. Ultimately, the entire bunker was then drybrushed with a very light sandcolor drybrush paint on places whereyou could imagine the wind would have swept up sand and landed on the bunker itself, so mainly the outside of the bunker close to the ground and here and there some patches on the inside, to help give it a nice weathered look, like it’s already been there for a while.

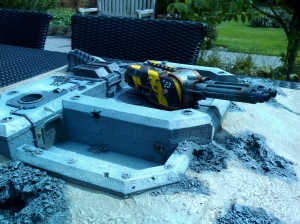
And then there is the ”eyecatcher” of the redoubt, the Double-Barrelled Destructor Cannon. This one is very similar to the one you would find on a Legion Falchion, so very cool.

I painted it in the colors of the Iron Warriors Legion. First painted it in a medium metallic iron, the washed the entire thing blue and drybrushed it back in iron, giving it a nice, cold metal kind of look. Then, I painted the black and yellow hazard stripes on the major ”hull” so it would really stand out from the bunker. Next  painted all the small details like computer and stairs on the side in the same medium metallic iron and, using GW’s glazes and tamiya clear colors, painted the screens themselves in the colors of my desire. Then, I painted the trims in a brass color, washing them with a sepia multiple times untill it was the shade I wnted it to be. This gives it a real nice weathered, old look. Then ultimately, when the entire cannon was completely painted, the last thing to do was decals. I found an old sheet of GW’s Chaos Space Marines decals and took the Iron Warriors emblem from it twice, one for each side. I applied it using Humbrol’s decalfix. Then I took a decalsheet from the Imperial Guard Baneblade set and cut out the number 23. This alsonwas applied using decalfix. After that was dry, I used a brush and a small amount of black paint and covered the edges of the decals, blending it in completely to the model, no edges visible anymore. The cnnon and the bunker are now dedicated to the Iron Warriors Legion, 23rd Grand Battallion.

If you find that the hazard stripes give you some trouble, go check my previous post on the Chaos Warhound dubbed ”Titan from the Warp” I explain how to paint hazard stripes very easily. You van apply them on anything of your liking and this way has helped me a lot. It may take a while but I am sure you will find the endresult most pleasing.

So that’s it. Down here you will find the pictures of the Iron Redoubt. Go check them out, and next time I will be uploading the next parts of the board.

Untill then, enjoy!

kr
kr
kr
kr
kr
kr

Feeding Grounds

Feeding Grounds

Heya guys,

It’s been a while since my last update, but here it is. Between the new Tyranid release and working on my Warhound Titan, I’ve lately also been working on my new gaming-board. Recently, someone gave me one because he couldn’t use it anymore because of him quitting the hobby. So I had the idea of making a Tyranid Infected forest board. I’ve already painted the board, covering it with NOCH forest flock I got from Conrad and put 8 magnets per individual tile. Then, I put magnets underneath trees i also bought from NOCH, so that, when working with line of sight and stuff, you can easily take the trees off, to check it, or to put models on the spot that are wider than the space between the trees. For now, I have 20 trees magnetized and ready to go, need 20 more, which I will be getting soon enough. Need to get me Nuln Oil wash to finish all the rock parts and hills and then, when that’s all finished, the board is ready to play on. Eventualy, I will be getting some Capillary Towers and Tyranid Brood Nests, the kind Forgeworld used to cast, paint those up in my Hive Fleet colors (Behemoth) and then all that’s left is finishing some Imperial Sector buildings I got lying around so I can switch aa little with terrain for certain custom missions I have in mind.

Aside from that (after I ran out of wash) I thought it was time to update my Tyranids. Not the models themselves, but their bases. Through the years, I have collected quite an amount of Tyranid models, and there have been some changes in themes on my bases. Just the colours of the base and the edge. but now that I am working on my new gaming board, I just loved the theme of it, that I decided to paint every base of every model I have so far in that same theme. So I started 2 days ago and I’m almost done. All that’s left now is a Barbed Hierodule, 126 Hormagaunts and 94 Termagants and I’m done. After that’s done, I can finally start posting some pictures of my Tyranids on this page as well, as I am really hell-bent on getting every done properly. So if you are interested in what my Tyranids look like, keep an eye out on this page, because the infestation is about to make planetfall.

As soon as the gaming board is finished I will be posting some pictures, along with some terrain for it, to give you an idea what it looks like.